Account management

Co-pilot

Designing

Integrations

Import & Export

Review & Quality Control

Templates

Working with others

Coursensu Course Companion for Moodle - Setup and Initial Configuration Guide

Matt
Updated:
August 27, 2025

1. Overview

The Coursensu Course Companion is a dynamic Moodle block that brings the power of Coursensu's learning design directly into your Moodle courses. It operates in two modes:

  • For Educators / Course Editors: When editing is turned on, the block appears and provides a powerful toolkit, providing insights, analytics, and access to your teams’ collection of learning designs within Coursensu to provide any Moodle editor with the ability to enhance their course structure, content and activities.
  • For Learners: Not enabled by default. In development but offered as pre-release ‘alpha’. This block aims to provide an interactive Course Q&A assistant, answering student questions based only on course content to reduce instructor workload and provide on-demand student support.

This guide will walk you through setting up and using the Course Companion block.

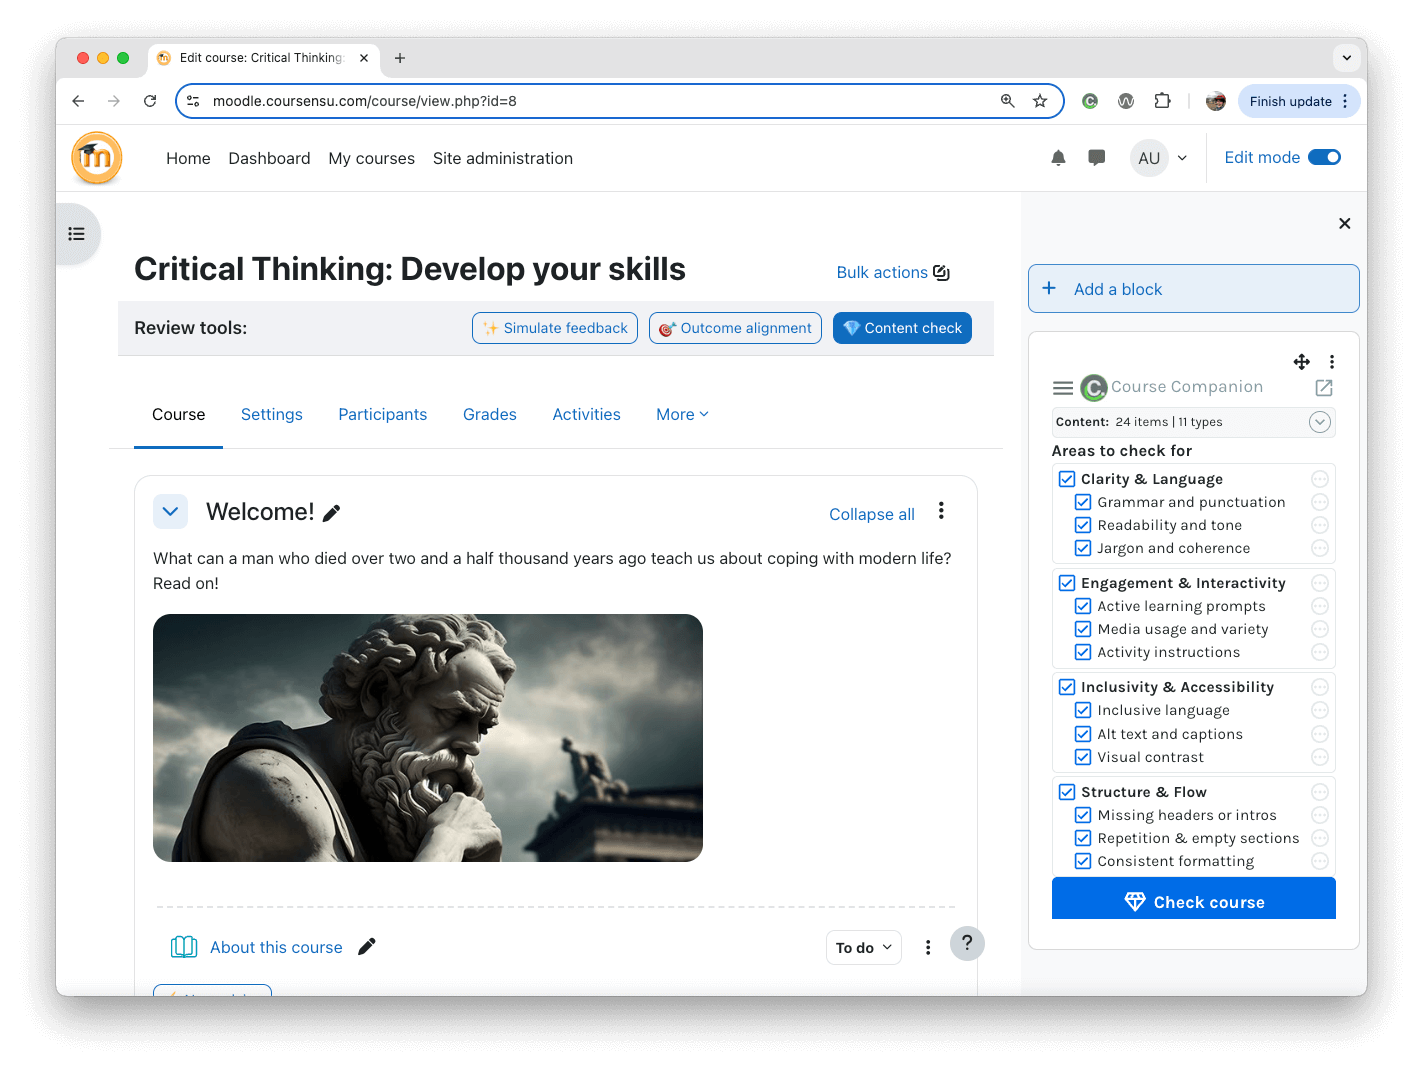
A screenshot of the Course Companion in a 'Critical Thinking' Moodle course

2. Requirements

  • One or more Coursensu accounts (trial or paid).
  • Moodle 4.5 or later.
  • Site Administrator access to your Moodle site for installation and initial configuration.
  • REST protocol and selected web service functions enabled in your Moodle (or the ability to enable this).

3. Configuration in Coursensu

Before installing the Moodle plugin, you need to generate an API key in your Coursensu account.

A. Generate Your API Key

  1. Log in to your Coursensu account - you’ll need to be a Coursensu Organisation Administrator.
  2. Navigate to your user profile icon and select My team from the user profile menu.
  3. Go to the Integrations & API tab.
  4. Select Moodle from the Organisational LMS dropdown menu.
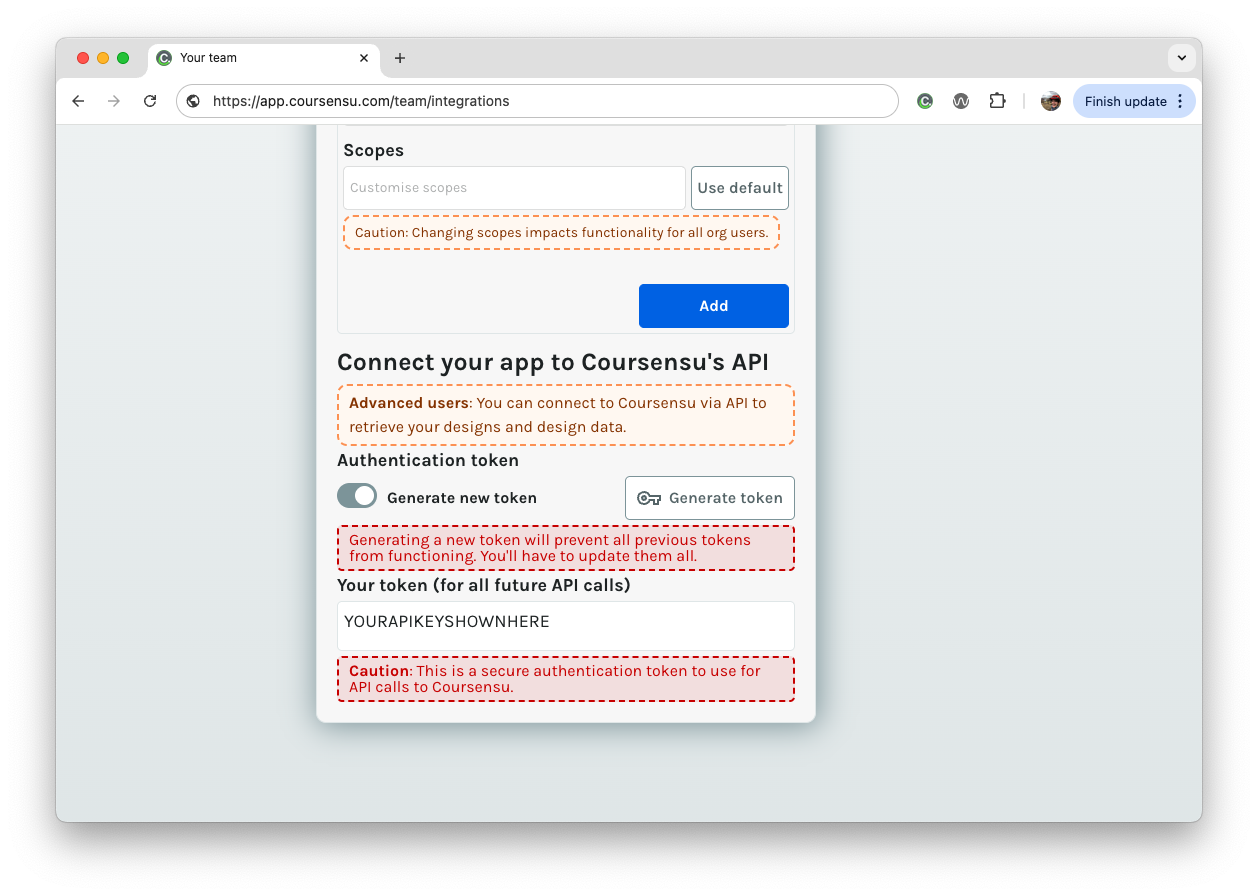
  5. Scroll to Connect your app to Coursensu's API, enable the Generate new token toggle and then select the Generate token button. Note: This will overwrite any existing token.
  6. Copy the token. You will need it to configure the plugin in Moodle. Keep this key secure, as it provides API access to your Coursensu workspace.
The Moodle integration section in Coursensu settings with the API key visible.

B. Invite Your Team (Optional)

For your course creators and instructors to use the educator tools, they must have an account in your Coursensu workspace.

  1. In Coursensu, navigate to My team > Members.
  2. Invite any instructors who will be using the Course Companion or Learning Designer features. Their Moodle and Coursensu email addresses must match.
  3. If you’re using an SSO provider (such as Microsoft) you can set this up via Settings, then select ‘Invite via SSO provider’ checkbox before sending an invite. This ties the account to your organisation and your SSO provision.

4. Installation in Moodle

  1. Request a copy of the Coursensu Course Companion plugin ZIP file from Coursensu.
  2. Log in to your Moodle site as an administrator.
  3. Go to Site administration > Plugins > Install plugins.
  4. Upload the ZIP file. Moodle will check the package and prompt you to continue.
  5. Click "Install plugin from the ZIP file" and follow the on-screen prompts to complete the installation. Moodle will run the installation scripts and report success.

5. Configuration in Moodle

After installation, you must first configure the block with your Coursensu API key and base URL. Then you will need to configure the REST protocol and related web services functions. This enables communication between Coursensu and Moodle.

Course Companion block configuration

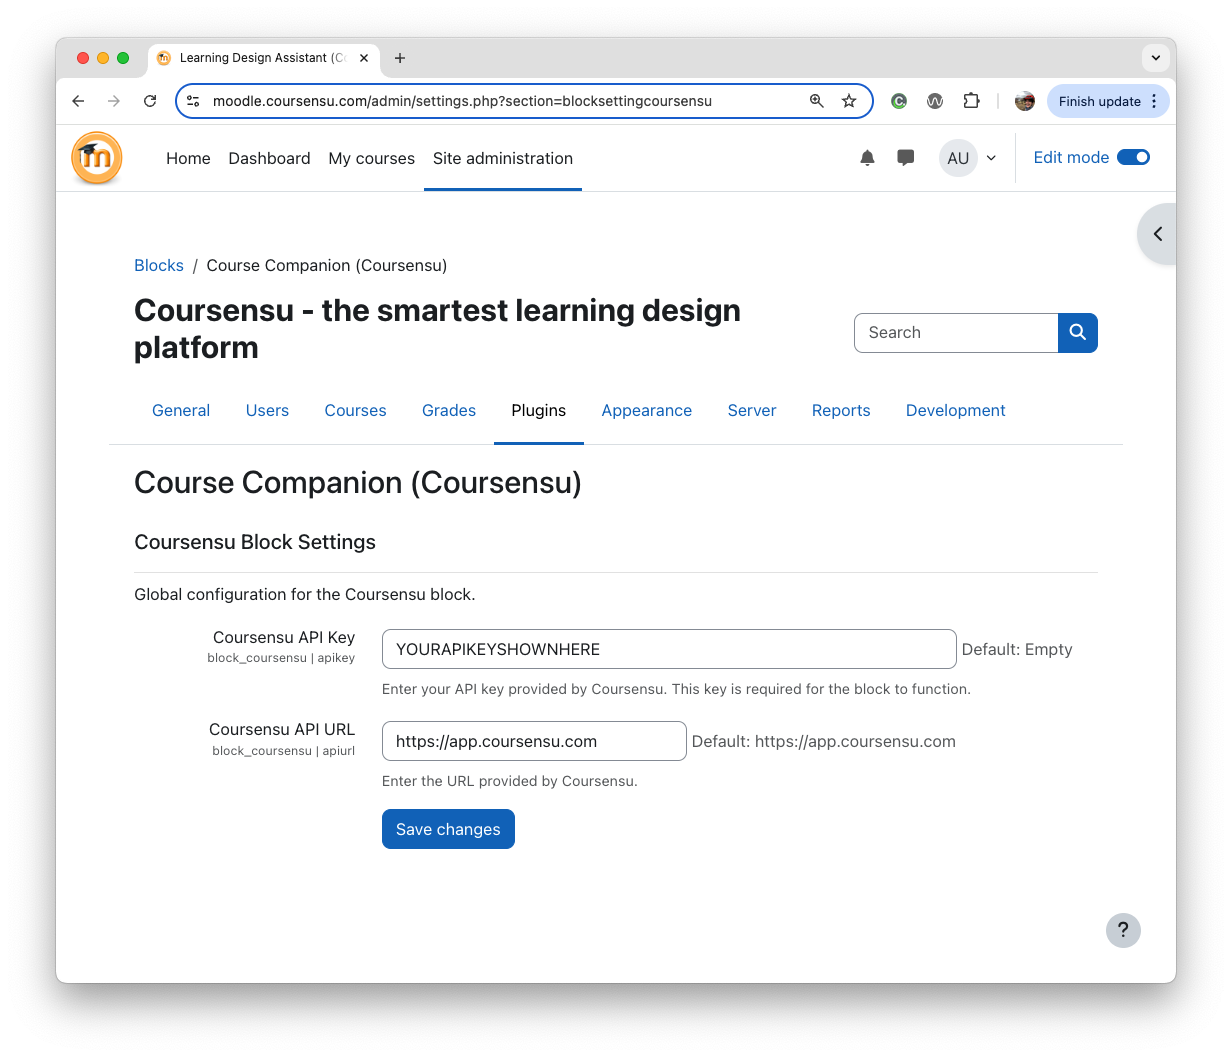
  1. Go to Site administration > Plugins > Blocks > Coursensu Course Companion.
  2. You will see two required fields:
    • API Key: Paste the API key you generated from your Coursensu account here.
    • Coursensu Base URL: This should be filled with the following URL:
      https://app.coursensu.com
      Do not change this unless instructed by Coursensu support.
  3. Click Save changes.

The block is now installed and configured for your entire Moodle site.

The Moodle settings page for the Coursensu block with the API key and URL fields

Web services configuration - Moodle

  • Browse to Site Administration > Server and select Web Services
Web services settings in Moodle
  • Browse to web services on Moodle's site admin
  • Enable web services (if set to No)
  • Browse to Site Administration > Server and select Web Services
Enabling web services in Moodle
  • Enable web services
  • Enable REST protocol
    1. From Site Admin > Server > Web Services select 2. Enable protocols
    2. Select the eye / visibility enable REST protocol - a standard format for platforms to connect with each other.
Enabling REST protocol
  • Enable the REST protocol
  • Optional: Create a specific web services user (that allows a connection and configure Moodle)
    • If you need a new user: Create a new Web Services user - From Site Admin > Server > Web Services select 3. Create a specific user
    • This step requires you to then create a user, or select an existing user, that will be used for the remainder of the Web Services configuration.
Selecting a user
Selecting a user

  • Our admin user is selected, but you can choose another user (or create a specific Web Services user). Note: The user does not need a Coursensu account. 
  • Configure web services for the previously selected user
    1. From Site Admin > Server > Web Services 
    2. Select 4. Check user capability. 
    3. Filter the permissions for that user by the word 'webservice' and ensure the permissions below are allowed for the selected user:
Checking the web services permissions for a user in Moodle
  • Filtering Moodle's permissions by web service
  • Next step - define the Coursensu web service. Select 5. Select a service and we’ll create a service for the functions needed to link Coursensu with Moodle
    1. Under Custom services you'll need to Add a new Custom service.
Adding a custom web service
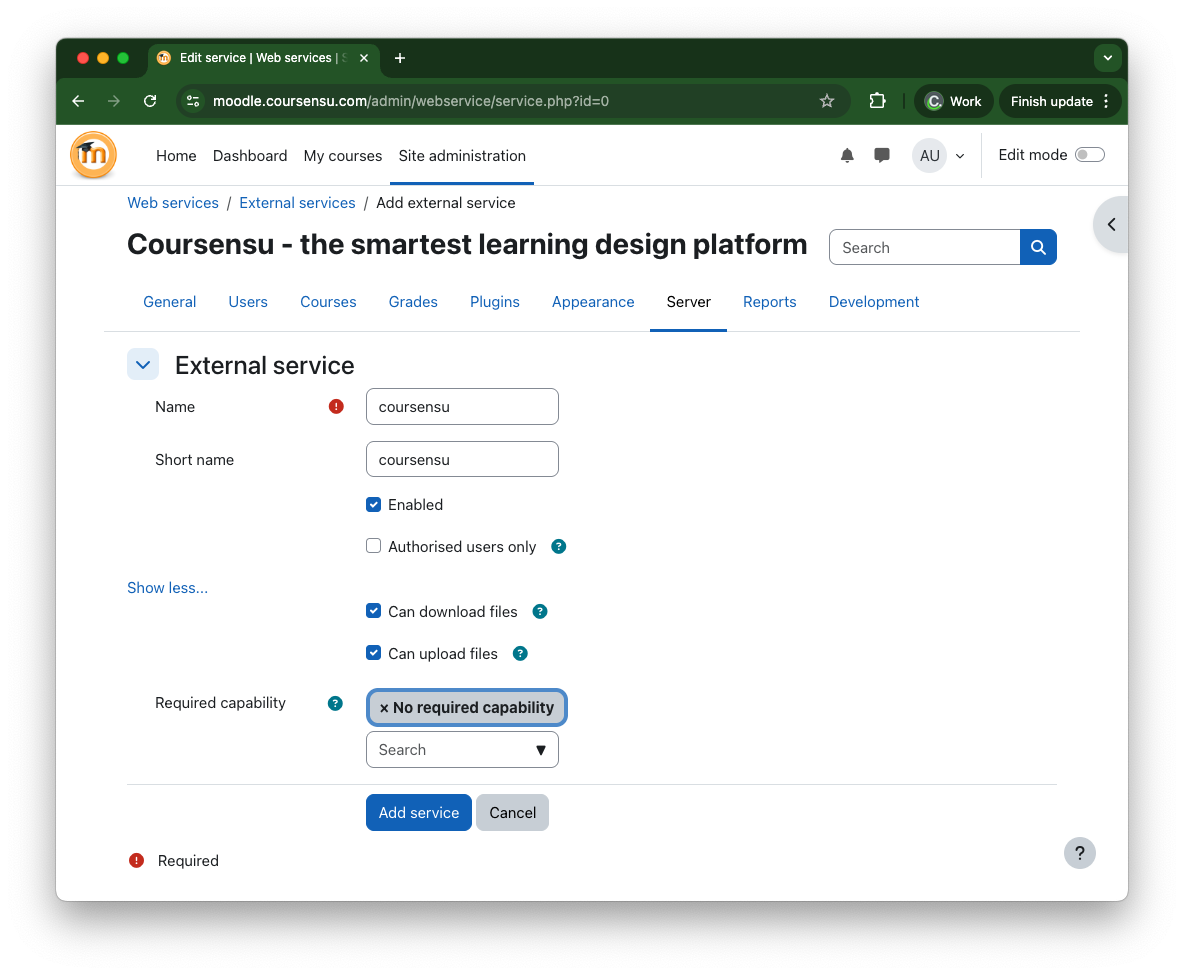
  • Setting up the Coursensu web service: 
    1. Provide a memorable Name and Short name
    2. Ensure the new service is Enabled
    3. Select ‘Show more’ to allow Can download files and Can upload files
    4. No extra capabilities are required.
  • Add Coursensu as a custom external service
Adding functions for that web service
Adding a custom web service

  • Setup Coursensu added as a new external web service
  • Next: 6. Add Functions to the new custom Coursensu web service.
    1. Select Functions from the new Coursensu custom web service we just created
    2. You'll need to add / enable the following functions to have a fully operational connection between Coursensu and Moodle: 

Added functions for the service "Coursensu"

Function Description and summary of functionality Required capabilities
core_calendar_get_action_events_by_courses Get calendar action events by courses moodle/calendar:manageentries, moodle/calendar:manageownentries, moodle/calendar:managegroupentries
core_courseformat_new_module Create a new module for a course. moodle/course:manageactivities
core_courseformat_update_course Update course contents. moodle/course:sectionvisibility, moodle/course:activityvisibility
core_course_create_courses Create new courses moodle/course:create, moodle/course:visibility
core_course_get_categories Return category details moodle/category:viewhiddencategories
core_course_get_contents Get course contents moodle/course:update, moodle/course:viewhiddencourses
core_course_get_courses Return course details moodle/course:view, moodle/course:update, moodle/course:viewhiddencourses
core_course_get_courses_by_field Get courses matching a specific field (id/s, shortname, idnumber, category)  
core_course_get_course_content_items Fetch all the content items (activities, resources and their subtypes) for the activity picker  
core_course_get_course_module Return information about a course module  
core_course_get_course_module_by_instance Return information about a given module name and instance id  
core_course_get_enrolled_courses_by_timeline_classification List of enrolled courses for the given timeline classification (past, inprogress, or future).  
core_course_import_course Import course data from a course into another course. Does not include any user data. moodle/backup:backuptargetimport, moodle/restore:restoretargetimport
core_enrol_get_enrolled_users Get enrolled users by course id. moodle/user:viewdetails, moodle/user:viewhiddendetails, moodle/course:useremail, moodle/user:update, moodle/site:accessallgroups
core_enrol_get_users_courses Get the list of courses where a user is enrolled in moodle/course:viewparticipants
core_files_get_files browse moodle files  
core_files_upload upload a file to moodle  
core_user_get_users search for users matching the parameters moodle/user:viewdetails, moodle/user:viewhiddendetails, moodle/course:useremail, moodle/user:update
enrol_manual_enrol_users Manual enrol users enrol/manual:enrol
local_course_add_files_to_directory Add files to folder mod/folder:managefiles
local_course_add_new_course_module_assignment Creates a new Assignment course module.  
local_course_add_new_course_module_book Add course module Book mod/book:addinstance
local_course_add_new_course_module_directory Add course module folder mod/folder:addinstance
local_course_add_new_course_module_forum Creates a new Forum course module.  
local_course_add_new_course_module_label Creates a new Label course module.  
local_course_add_new_course_module_page Add course module Page mod/page:addinstance
local_course_add_new_course_module_quiz Creates a new Quiz course module.  
local_course_add_new_course_module_resource Add course module Resource mod/resource:addinstance
local_course_add_new_course_module_url Add course module URL mod/url:addinstance
local_course_add_new_section Add new course section block/section_links:addinstance
local_course_save_attachment_in_page Add attachment in page module mod/page:addinstance
local_course_update_course_module_assignment Update course module of type assignment mod/assign:addinstance
local_course_update_course_module_label Update course module of type label (aka text\&media) mod/label:addinstance
local_course_update_course_module_lesson Update course module of type lesson mod/lesson:addinstance
local_course_update_course_module_lesson_contentpage Update page in a lesson mod/lesson:addinstance
local_course_update_course_module_page Update course module of type page mod/page:addinstance
local_course_update_course_module_resource Update course module resource mod/resource:addinstance
mod_assign_get_assignments Returns the courses and assignments for the users capability  
mod_book_get_books_by_courses Returns a list of book instances in a provided set of courses, if no courses are provided then all the book instances the user has access to will be returned.  
mod_choice_get_choices_by_courses Returns a list of choice instances in a provided set of courses, if no courses are provided then all the choice instances the user has access to will be returned.  
mod_choice_get_choice_options Retrieve options for a specific choice. mod/choice:choose
mod_data_get_databases_by_courses Returns a list of database instances in a provided set of courses, if no courses are provided then all the database instances the user has access to will be returned. mod/data:viewentry
mod_data_get_data_access_information Return access information for a given database. mod/data:viewentry
mod_feedback_get_feedbacks_by_courses Returns a list of feedbacks in a provided list of courses, if no list is provided all feedbacks that the user can view will be returned. mod/feedback:view
mod_folder_get_folders_by_courses Returns a list of folders in a provided list of courses, if no list is provided all folders that the user can view will be returned. Please note that this WS is not returning the folder contents. mod/folder:view
mod_folder_view_folder Simulate the view.php web interface folder: trigger events, completion, etc... mod/folder:view
mod_forum_add_discussion_post Create new posts into an existing discussion. mod/forum:replypost
mod_forum_get_forums_by_courses Returns a list of forum instances in a provided set of courses, if no courses are provided then all the forum instances the user has access to will be returned. mod/forum:viewdiscussion
mod_glossary_get_glossaries_by_courses Retrieve a list of glossaries from several courses. mod/glossary:view
mod_h5pactivity_get_h5pactivities_by_courses Returns a list of h5p activities in a list of provided courses, if no list is provided all h5p activities that the user can view will be returned. mod/h5pactivity:view
mod_imscp_get_imscps_by_courses Returns a list of IMSCP instances in a provided set of courses, if no courses are provided then all the IMSCP instances the user has access to will be returned. mod/imscp:view
mod_label_get_labels_by_courses Returns a list of labels in a provided list of courses, if no list is provided all labels that the user can view will be returned. mod/label:view
mod_lesson_get_lessons_by_courses Returns a list of lessons in a provided list of courses, if no list is provided all lessons that the user can view will be returned. mod/lesson:view
mod_lti_get_ltis_by_courses Returns a list of external tool instances in a provided set of courses, if no courses are provided then all the external tool instances the user has access to will be returned. mod/lti:view
mod_page_get_pages_by_courses Returns a list of pages in a provided list of courses, if no list is provided all pages that the user can view will be returned. mod/page:view
mod_quiz_get_attempt_access_information Return access information for a given attempt in a quiz. mod/quiz:view
mod_quiz_get_attempt_data Returns information for the given attempt page for a quiz attempt in progress. mod/quiz:attempt
mod_quiz_get_quizzes_by_courses Returns a list of quizzes in a provided list of courses, if no list is provided all quizzes that the user can view will be returned. mod/quiz:view
mod_quiz_get_quiz_access_information Return access information for a given quiz. mod/quiz:view
mod_quiz_get_user_quiz_attempts Return a list of attempts for the given quiz and user. mod/quiz:view
mod_quiz_process_attempt Process responses during an attempt at a quiz and also deals with attempts finishing. mod/quiz:attempt
mod_quiz_start_attempt Starts a new attempt at a quiz. mod/quiz:attempt
mod_resource_get_resources_by_courses Returns a list of files in a provided list of courses, if no list is provided all files that the user can view will be returned. mod/resource:view
mod_resource_view_resource Simulate the view.php web interface resource: trigger events, completion, etc... mod/resource:view
mod_scorm_get_scorms_by_courses Returns a list of scorm instances in a provided set of courses, if no courses are provided then all the scorm instances the user has access to will be returned.  
mod_scorm_get_scorm_access_information Return capabilities information for a given scorm.  
mod_url_get_urls_by_courses Returns a list of urls in a provided list of courses, if no list is provided all urls that the user can view will be returned. mod/url:view
mod_wiki_get_wikis_by_courses Returns a list of wiki instances in a provided set of courses, if no courses are provided then all the wiki instances the user has access to will be returned. mod/wiki:viewpage
mod_workshop_get_assessment Retrieves the given assessment.  
mod_workshop_get_workshops_by_courses Returns a list of workshops in a provided list of courses, if no list is provided all workshops that the user can view will be returned. mod/workshop:view

Moodle function requirements explained: 

Yellow highlighted items provide the additional Coursensu Sync Services, a secondary plugin required for Course Companion to add and modify Moodle core activities and resources, and for Coursensu to convert learning designs into Moodle courses. These are read/write functions.

User profile and course enrollment functions provide the functionality to check, list and update only the courses which each specific user has access to.These are read-only functions. Create courses, upload files and enrol users are read/write functions. 

Mod_x_get_x_by_courses is Moodle’s set of web service functions that permit an API to read the activities and resources within a course. These are read-only functions.

  • Next is to 8. Create a token for your selected Coursensu web services user
    1. Tokens enable the Moodle and Coursensu platforms to safely and securely communicate with each other. You need to add a new token for your custom web services so the platforms can connect and communicate.
    2. You can review allocated tokens, and create tokens, from this page.
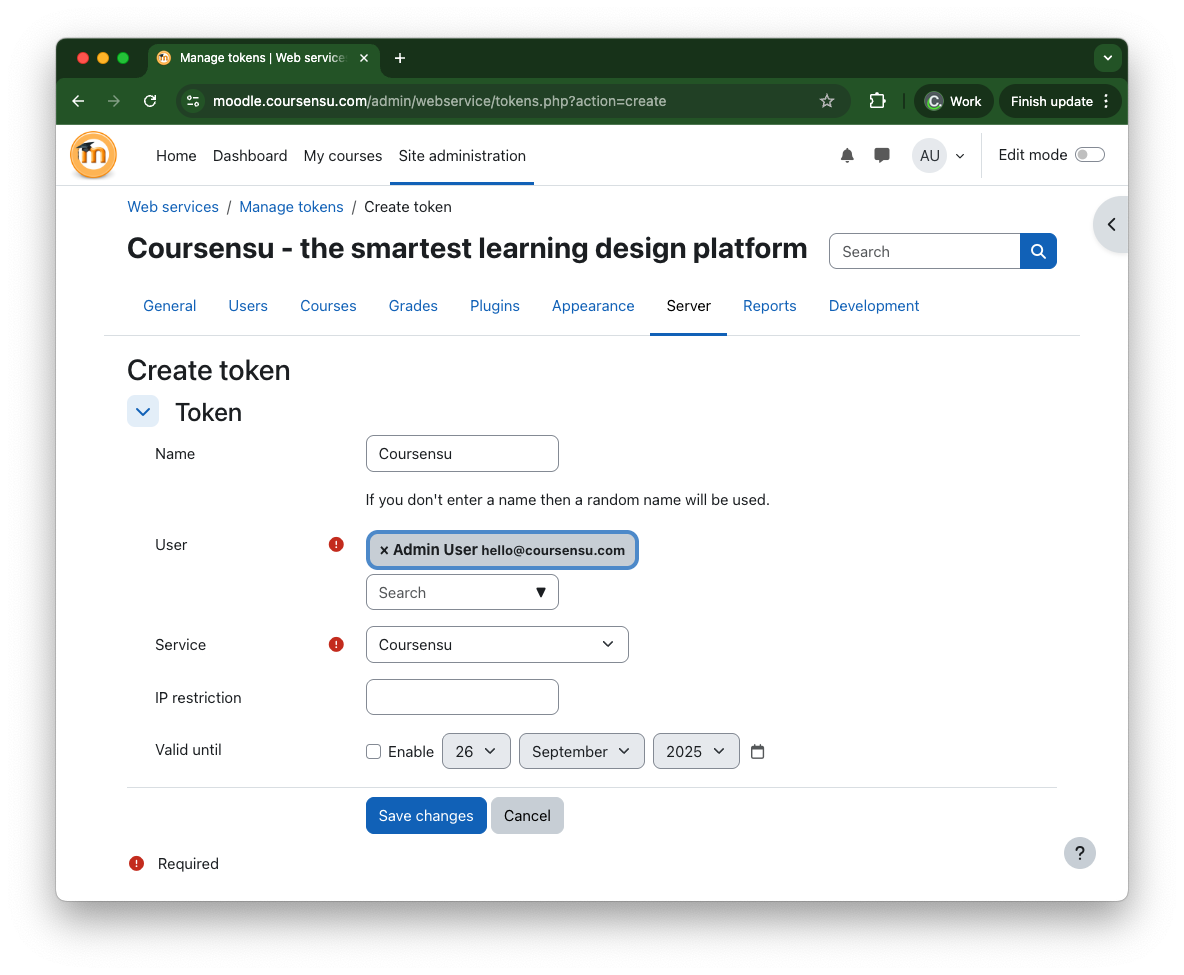
Setting up a new token for the web service user

  • Setting up the token for our previously selected Coursensu Web Services user 
    1. Once the token has been generated, you’ll only get to see it once from Moodle - so you need to either story it securely in an approved password manager application, or enter it directly into Coursensu. 
Viewing all tokens
Viewing all tokens
  • Our web service user and their tokens assigned. Note that no expiry is set.

Add the Web Service token to your Coursensu team integrations. 

  1. Log into Coursensu with a Coursensu Organisational Admin account
  2. Select the user profile icon and then My team - to load the Team admin page.
  3. Select Integrations and API. 
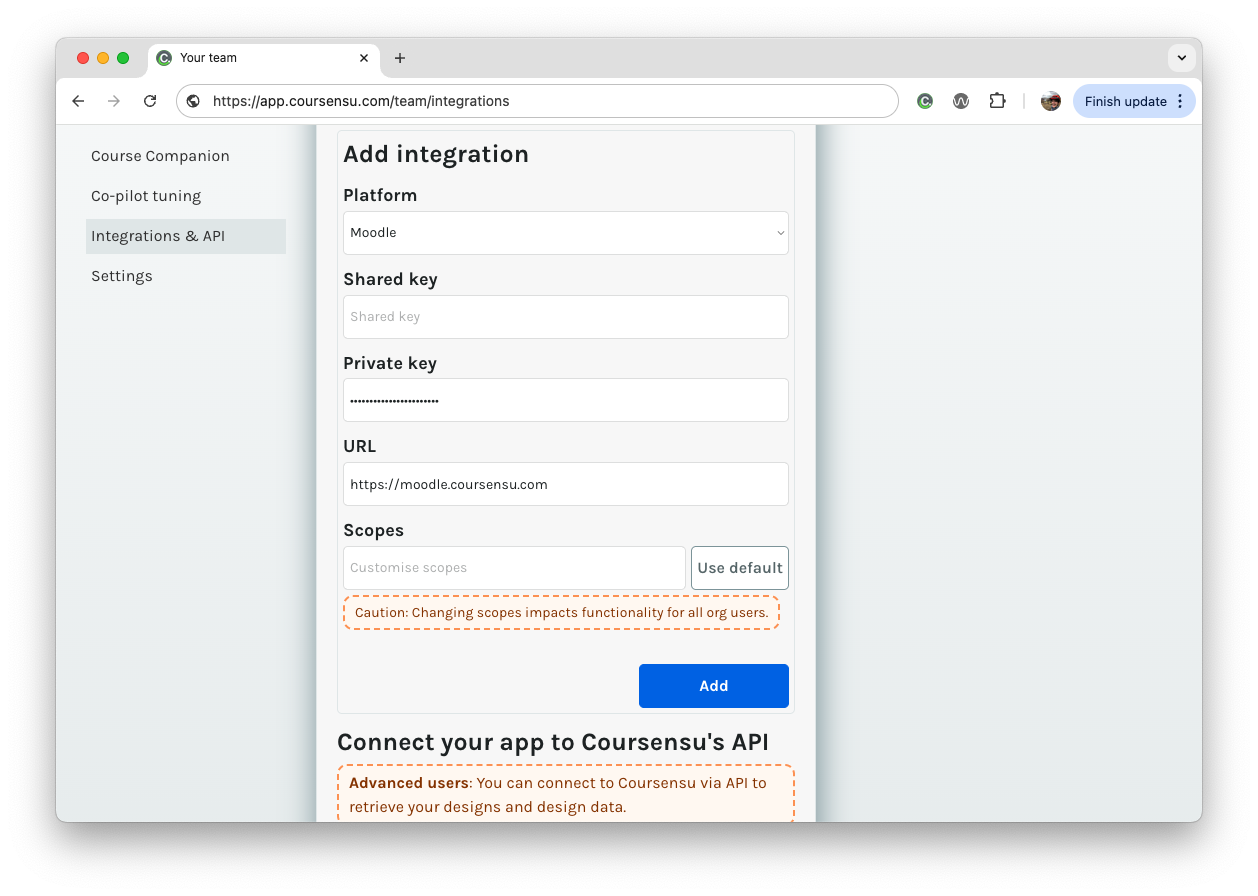
  4. In the Add integration page, enter your Moodle’s connection information. Note you only need to complete three fields: 
    1. Platform - Moodle
    2. Private key - Your Moodle Coursensu Web Services Key (just generated in the steps above).
    3. URL - Your Moodle base URL (note - https and no trailing forward slash)
  5. Select Add to finalise setup and connect your Moodle instance with Coursensu. 
Adding Moodle integration to Coursensu

6. Using the Course Companion in Your Courses

A. Add the block to a course

Instructors / Admins and Course Editors can now add the block to any of their courses.

  1. Navigate to the course page where you want to add the block.
  2. Click "Turn editing on" (top right).
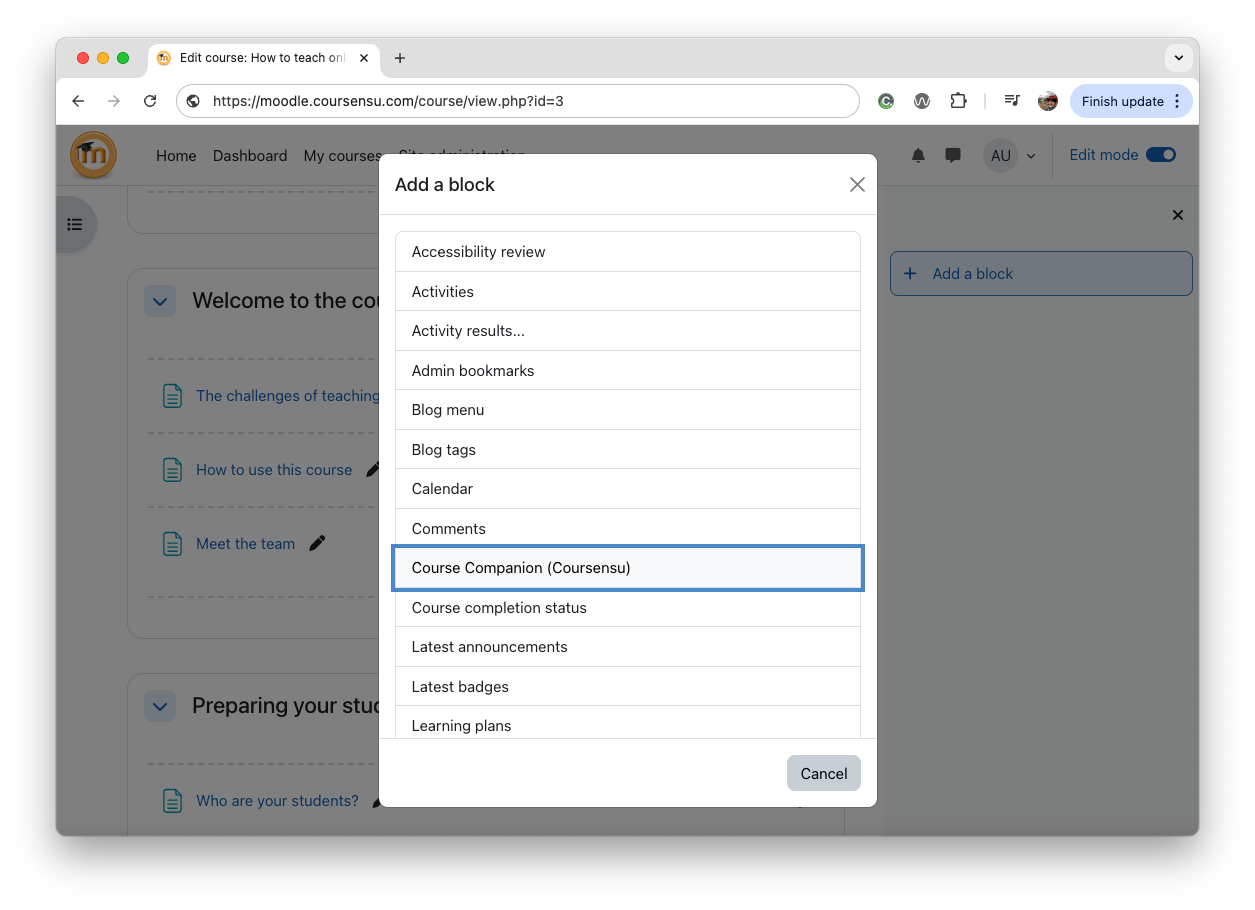
  3. In the right-hand block drawer, click "Add a block".
  4. Select "Coursensu Course Companion" from the list.
  5. The block will now appear on the course page
Adding Course Companion to your Moodle course

B. Access the educator tools

The block's toolkit for instructors is revealed when editing is enabled.

  1. Ensure you have added the block to your course page.
  2. Click "Turn editing on".
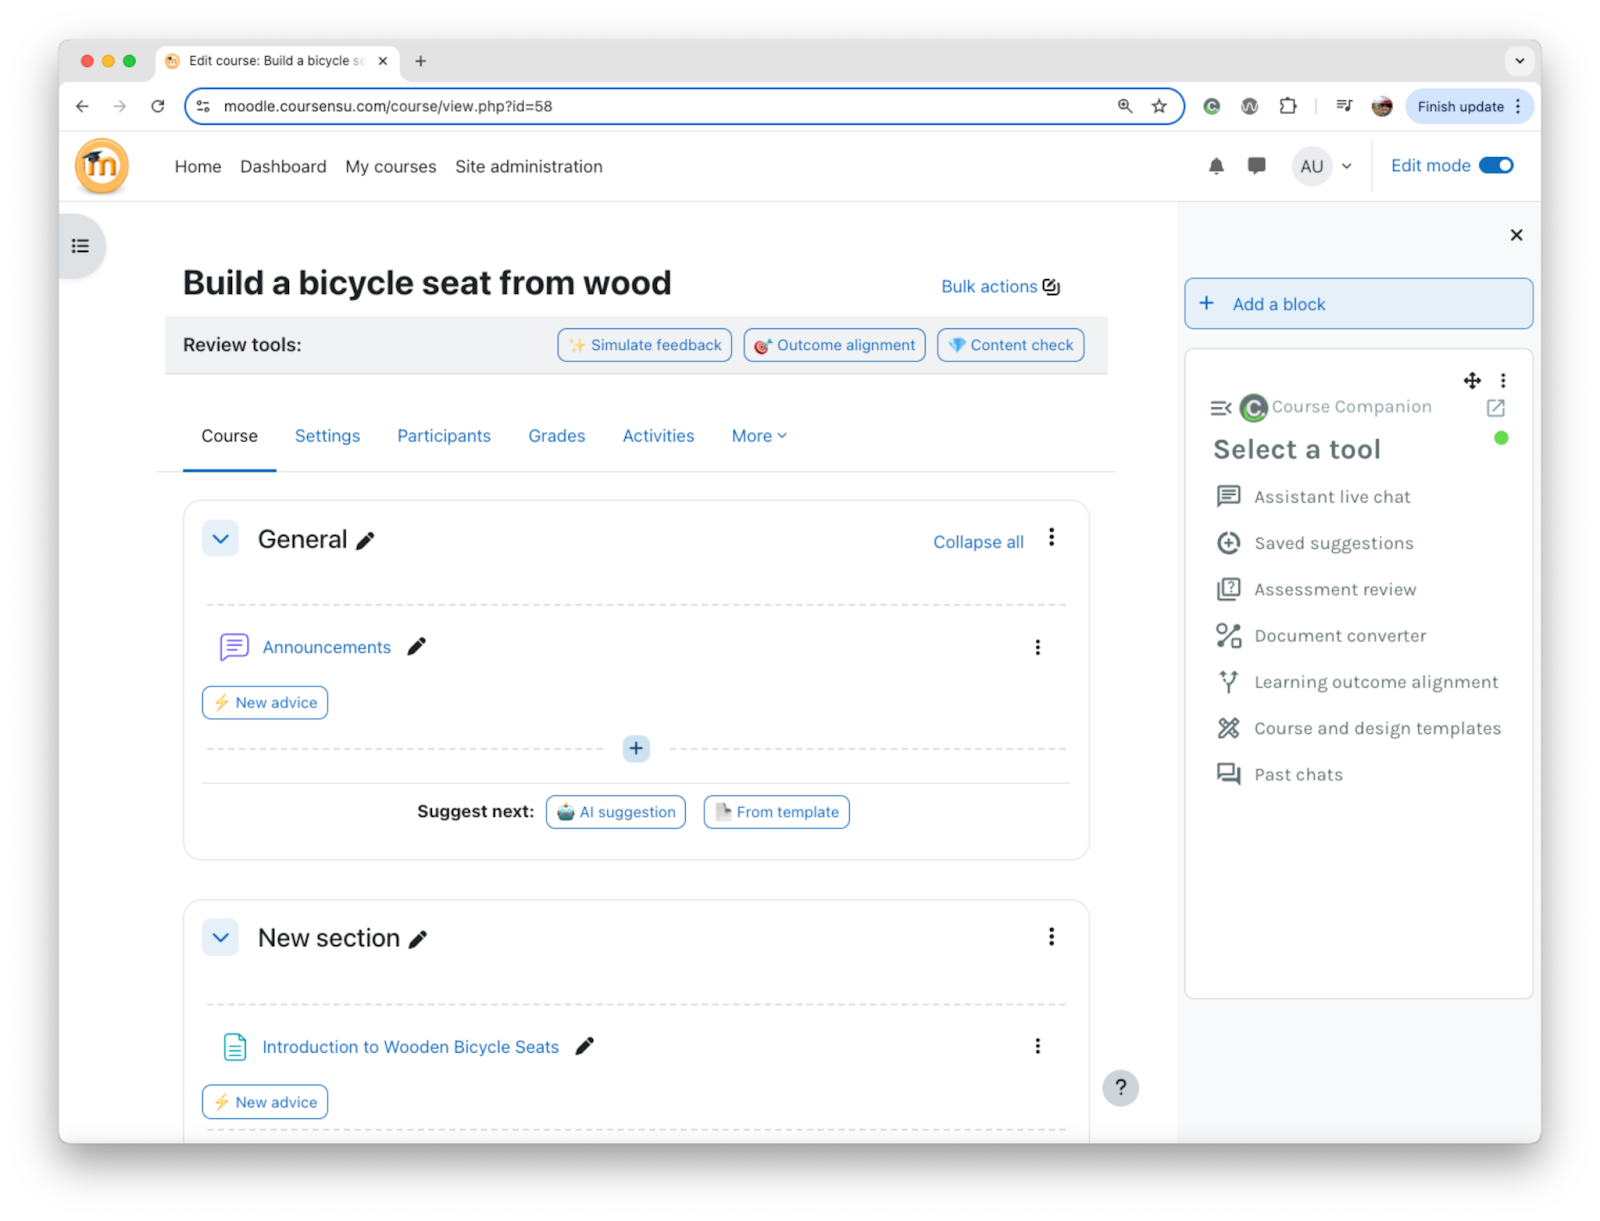
  3. The Course Companion block now appears and shows the full educator toolkit, loading the Coursensu interface directly within Moodle.
  4. Alongside the block are also a range of integrated buttons throughout the course: 
    1. Review tools for course-wide quality checking at the top
    2. Contextual advice and dynamic suggestions for activity and resource items.
    3. Suggest next with AI or your team’s Learning Designer templates, at the end of each section.
A view of the Course Companion block added, with editing enabled

7. Extending Course Companion's Functionality

A. Using Coursensu Learning Designs

Within the educator toolkit, you have access to your Coursensu learning designs created by your teammates. Educators can use this, and the AI suggestions, to browse, adapt, and get inspiration for course activities and structure without ever leaving their Moodle course.

B. Unlocking Full Power: The Coursensu Moodle Sync Plugin

While the Course Companion block provides insights and a window into Coursensu, even more capabilities are unlocked when you add the Coursensu Moodle Sync Plugin.

This separate plugin is a local plugin that works in the background. It provides the API that allows the Course Companion block to create, update, and modify Moodle activities and resources directly from the Coursensu interface.

With the Coursensu Moodle Sync Plugin installed, you can:

  • Apply a learning design from Coursensu and have it automatically create the corresponding activities (Assignments, Quizzes, Pages) in your Moodle course.
  • Update course content based on Coursensu's AI recommendations with a single click.

Please refer to the Coursensu Moodle Sync Plugin documentation for installation and setup instructions.

8. Troubleshooting & FAQ

  • The block shows an error about configuration.
    • This usually means the API Key is missing or incorrect. Please ask your Moodle administrator to verify the key in Site administration > Plugins > Blocks > Coursensu Course Companion.
  • The block is empty or shows a loading spinner that never finishes.
    • Confirm with your administrator that the "Coursensu Base URL" in the settings is correct (https://app.coursensu.com). Also, check your browser's developer console for any network errors that might indicate a firewall is blocking access to Coursensu.
  • The block shows “Setup incomplete”.
    • Ensure a Coursensu Administrator has generated an API key and added the Moodle integration details into the Integration and API area. 
  • I can see the ‘Connect’ button next to a red circle (in the Course Companion block).
    • This is required to connect your Coursensu and Moodle accounts. You’ll only need to connect once. Users must ensure they are using the same email address between systems, are logged in and using their organisational SSO account.

9. Support & feedback

For any questions, technical issues, or feedback, please contact support hello@coursensu.com - we’re always keen to hear from you.

We also want to hear your feedback, good or bad. It all goes into a continuous cycle of developing and improving the platform. 

Related support articles

Have a question? Ask Coursensu AI 👉